Hand Tool Kits
Wire Belt’s new range of hand tool kits, all your tools in one place stored in a durable carry case. These kits are ideal for your maintenance teams to aid installation and maintain your Flat-Flex Belts, keeping your belts running in optimum condition. Each kit contains a comprehensive Flat-Flex Support Guide with detailed maintenance and joining instructions, troubleshooting guide and potential causes of downtime.
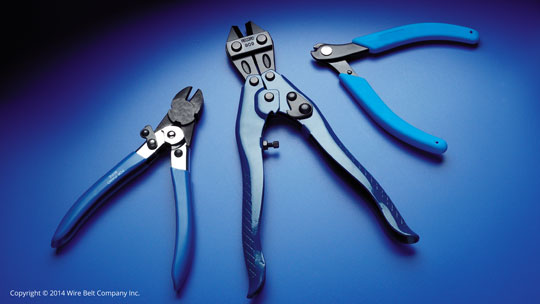
Flat-Flex® 0.90 to 2.35mm Wire Tool Kit Part Number FFKIT-0.90-2.35
A comprehensive tool kit, designed for OEM customers and large end-user sites that utilise the full range of Flat-Flex® belting. From delicate product transfer to heavy duty fryer applications, this kit provides the engineer with all the tools necessary to ensure a safe and consistent join.
Each kit contains:
- Eddie Wire Straightener
- Universal Cutting Nippers
- Side Cutting Pliers
- Needle Nose Pliers
- Fine Wire Cutting Pliers
Flat-Flex® 0.90 to 1.27mm Wire Tool Kit Part Number FFKIT-0.90-1.27
A tool kit developed for fine wire applications, such as chocolate enrobing and other confectionery processes. Each tool has been specially selected for robustness and user comfort when working with high tensile music wire. A well-maintained enrober belt will provide safe and consistent operation, whilst preventing product marking through broken and deformed strands.
Each kit contains:
- Eddie Wire Straightener
- Needle Nose Pliers
- Fine Wire Cutting Pliers
Flat-Flex® 1.27 to 2.35mm Wire Tool Kit Part Number FFKIT-1.27-2.35
A compact tool kit, suitable for medium to large wire diameters common to poultry and sea-food processing applications. The combination of Side Cutting Pliers and Eddie Wire Straightener assists the joining process for heavy gauge wire belts, reducing down-time and increasing reliability.
Each kit contains:
- Eddie Wire Straightener
- Universal Cutting Nippers
- Side Cutting Pliers

Belt Maintenance Tools
Eddie Wire Straighteners Part Number 017007
Essential for joining and maintenance of Flat-Flex Belting
- High quality wire straightening tool
- Remove distortions in the wire and adjust Z-bends
- Perfect for opening and closing C-Cure edge loops
- Suitable for wire diameters from 0.90 to 2.35mm

Universal Cutting Nippers Part Number 017008
For cutting all Flat-Flex Belting
-
Micro-structured cutting edge suitable for cutting all Flat-Flex belting including 4mm wire diameter.
-
The compound lever design gives good mechanical advantage, enabling high tensile wire to be cut with low handle loads. As a result, operator fatigue in a repetitive situation is greatly reduced.
-
Gripping surface below the joint suitable for wire diameters from 1.0mm
-
Multi-component handles with integrated spring return and locking device
-
Fully heat-treated, chemically blackened jaws.
-
Manufactured to DIN ISO 5743:2004

Fine Wire Cutting Pliers Part Number 017004
For cutting fine wire Flat-Flex wire belting
-
Suitable for use with high tensile music wire belts
-
Slim profile head for cutting tightly-pitched belts common to chocolate enrobing processes
-
Leverage reduces force expenditure by 40%
-
Spring return
-
Manufactured to DIN ISO 5747:1995

Side Cutting Pliers Part Number 017003
For cutting and joining Flat-Flex Belting
- The jaws remain parallel throughout their range of movement giving a positive grip.
- The jaws are knurled with a single longitudinal V-slot. Wire can be fed through the throat of the plier from either end and held firmly over the length of the jaws.
- Spring return and knurled jaws.
- Anti-rust finish with bright nickel plated handles and fully heat treated chemically blackened jaws and cutter.
- Good mechanical advantage on the cutter allows high tensile wire to be cut with low handle loads. The position of the cutter on the side of the plier ensures that the tool can be used where access is limited.

Micro Shear Wire Cutters Part Number 017006
For cutting stainless steel Flat-Flex belting
-
The self sharpening design gives good mechanical advantage enabling wire to be cut with no loss of sharpness.
-
Compact design with spring return, heat treated and chemically blackened.
-
Suitable for wire diameters up to 1.27mm.
EZSplice Multi-Head Profiling Pliers Part Number 017009
For use with EZSplice joining strands
- Individual heads for each pitch and wire combination within the EZSplice range
- Crimps joining strand to ensure a secure belt join with a flat carrying surface
- Prevents “over-crimping”

CompactGrid Pliers Set Part Number 017013
For splicing CompactGrid Belting
- Custom designed CompactGrid Tool kit to make splicing as simple and easy as possible
- Each tool kit contains two CG-Splice Levers, and one set of CG-Splice Pliers.
- The tools are designed to help align and crimp the belt into place.
- The tools provides a perfectly shaped crimp, making the splice joint complete without damaging surrounding wire strands or over-crimping the splice strand.

Ladder Belt Clinching Tool Part Number 017012
For use with Ladder Belt
- Purpose built tool facilitates easy opening and closing of Ladder Belt edges for joining
Installing joining clips
Joining clips come in two varieties: 1-space and 3-space clips. The 3-space clip is obviously stronger because its center space is woven into the belt as in the full strand joining method. These two types of clips should be used together, whenever possible to create a stronger splice and to help minimize the spacing gaps in the belt. (For example, a 7-space belt could be spliced using two 3-space clips... where as, a 9-space belt would use 1 single and two 3-space clips. See drawings below.) Refer to the chart on the reverse side for how many clips you should use for your belt.
IMPORTANT NOTE:
Two different end loops from adjacent clips cannot be attached to the same Z-bend. Only one joining clip end loop per Z-bend is allowed.
IMPORTANT NOTE:
There will be a full space gap between joining clips, please ensure product will not get trapped or fall through this gap.
IMPORTANT NOTE:
If a belt has damage in more than one place on account of fatigue, do not try to repair it. Install a new belt. Also, never save old belts to use for repairs because they have already been weakened from use. Purchase several extra feet of new belt to use exclusively for repairs.
| How Many Clips? | ||
| Number of Belt Spaces | Single Clips | Single + 3-Space Clips |
| 3 | 2 | 0 + 1 |
| 5 | 3 | 1 + 1 |
| 7 | 4 | 0 + 2 |
| 9 | 5 | 1 + 2 |
| 11 | 6 | 0 + 3 |
| 13 | 7 | 1 + 3 |
| 15 | 8 | 0 + 4 |
| 17 | 9 | 1 + 4 |
| 19 | 10 | 0 + 5 |
| 21 | 11 | 1 + 5 |
| 23 | 12 | 0 + 6 |
| 25 | 13 | 1 + 6 |
| 27 | 14 | 0 + 7 |
| 29 | 15 | 1 + 7 |
| 31 | 16 | 0 + 8 |
| 33 | 17 | 1 + 8 |
| 35 | 18 | 0 + 9 |
| 37 | 19 | 1 + 9 |
| 39 | 20 | 0 + 10 |


-
Before you begin joining:
- Plan out the number, type and placement of joining clips by laying them out in position across the belt
- Make certain that no two end loops on the clip hook around the same Z-bend and that all end loops point away from the direction of belt travel
-
Begin installation with the center space:
- Insert the appropriate type of joining clip into the center space on the edge of the belt
- If installing a single clip, use needle nose pliers to grip the splice clip, and hook the two ends around the Z-bends on either side of the center space
- -OR- If using a 3-space clip:
- Bend the clip in the center and insert the ends into the two spaces next to the center space
- Then insert the ends into the center space of the opposite edge and pull through until the center “locks” into place
- Use the needle nose pliers to grip the end loop, bend the wire up and hook it around the Z-bend on the opposite edge of the belt. Repeat for other end loop.
- Straighten the wire with pliers
-
Install the next joining clip on an outside edge if a single clip is used:
- Remove the ties holding the edges together
- Insert the joining clip through the near edge
- Connect the edge loop to the joining clip
- Grip the joining clip with your pliers and hook the end around the adjacent edge loop and the first Z-bend on the far edge
- -OR- If a 3-space clip is used:
- Remove the ties holding the edges together
- Bend and insert the joining clip around the second space in from the belt edge, then insert the ends into the opposite edge of the belt. Pull through until center locks in place
- Using pliers, connect the outside edge loop to the joining clip. Then grip the end of the clip and hook it around the adjacent edge loop. Hook the opposite end to its adjacent Z-bend
- Straighten wire with pliers or Wire Belt’s wire straightening tool
-
Install joining clip on the opposite edge:
- Install the same type of joining clip on the opposite edge in the same way
-
Install the remaining joining clips:
- Install the remaining joining clips, as appropriate, across the belt. There should be the exact same number and type of joining clips on either side of the center clip (the first clip you installed)
-
Re-tighten the tension